
The delivery date picker feature in Stream allows your customers to select a preferred delivery date via their unique tracking link. Once they select a date, it will set the ‘Required Date’ field on the order to the date they have selected.
In order to allow your customers to select their own delivery dates, you will first need to enable the delivery date picker, then set up a delivery schedule, and set up route capacities.
Below we’ll explain how your customers use the delivery date picker, and also how to configure and set it up. Skip to setup
Using the delivery date picker
In this section, we’ll explain how your customers will use the delivery date picker on their tracking screen.
With the delivery date picker feature turned on, when you send a customer an email or SMS containing their tracking link, they will be able to open the link and select a specific delivery date using the on-screen date picker, provided their address falls within one of the areas set by your Delivery Schedule.
The dates they are able to select will be determined by the setup configured in the Delivery Schedule and Route Capacity settings.
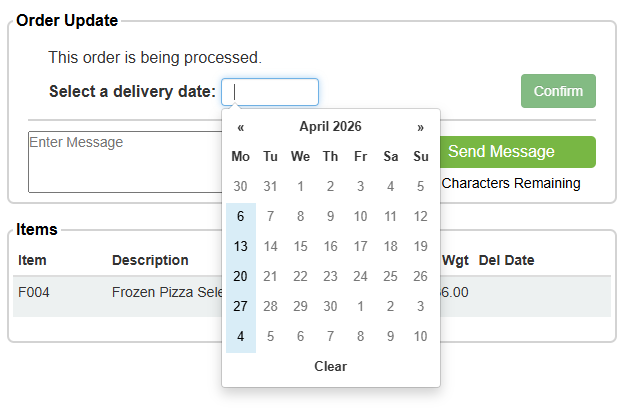
Once the customer has selected their delivery date, the ‘Required Date’ field will be populated against the order, as will the Route Info field, which will provide the planning team with notice of which route/run the order needs to be planned onto.
Cancelling a delivery after selecting a date
After selecting a delivery date, a customer will have the option to cancel the delivery and rebook it for a different date from the same tracking link.
To do this, they can click the ‘Cancel’ button in the Order Update section of their tracking screen.
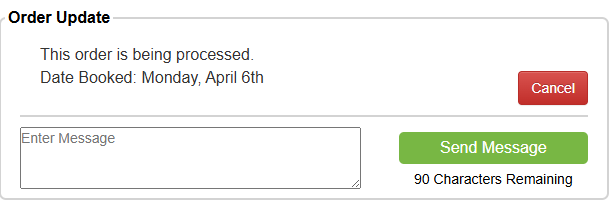
The customer will be unable to cancel the delivery via their tracking screen after:
- The order has been planned onto a run in Stream
- The delivery cancellation window has passed (you will configure this in the Enabling delivery date picker section)
If they need to cancel the delivery after either of the above have occurred, then they will need to get in contact with your team directly.
Enabling the delivery date picker
To enable the delivery date picker for your customers:
- Click ‘Settings’ in the main menu. If you don’t have access to the Settings screen in your Stream account, contact your system administrator.
- Click ‘Tracking’ in the left sidebar on the Settings screen and scroll down to the ‘Delivery Date Picker’ section
- Click ‘Enable Delivery Date Picker
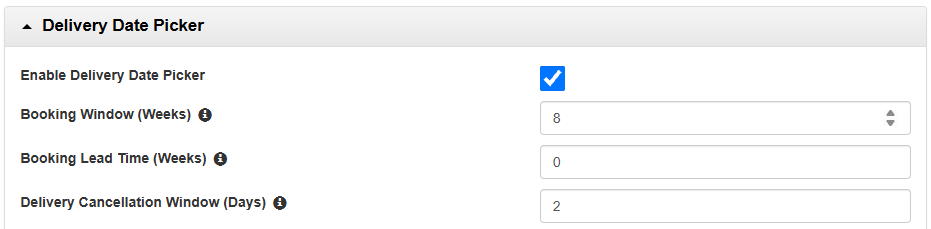
- Use the ‘Booking Window’ field to set how many weeks’ worth of slots to show to customers when selecting a delivery date.
- Use the ‘Booking Lead Time’ field to set how many weeks from the current date that a customer can select a delivery date. Setting this to 0 will allow a customer to select dates from the next available date in the schedule.
- Use the ‘Delivery Cancellation Window’ field to set how many days before the delivery date that a customer can cancel the delivery. This should be set to the number of days in advance of the delivery date that you would expect the delivery to be planned onto a run.
- Once you’re happy with your changes, click ‘Save’ at the bottom of the Settings screen.
Setting up the Delivery Schedule
The delivery schedule is what you will use to determine the areas you serve and the days of the week on which you serve them.
To set up your delivery schedule:
- Click ‘Settings’ in the main menu
- Click ‘Tracking’ in the left sidebar on the Settings screen and scroll down to the ‘Delivery Scheduling’ section
- Click the ‘Download’ button next to ‘Download Schedule Data’. This will download a CSV file containing your current Delivery Schedule data. The file will be blank if it’s your first time downloading it.
- Open the CSV file
- Enter your data into the CSV file:
- Area – Enter the Postcode for each new area on a separate row in this column
- Type – Enter ‘POSTCODE’ in this column.
- Days (Monday – Sunday) – Enter the route that needs to be used for this area on this date. The values entered here will need to match the values used in the ‘Route’ column of your Route Capacity data. Leaving a column cell blank will mean no delivery dates will be available to your customers on that day.
- Date_From – Enter the date that slots will start to be available for this delivery schedule. You can leave this field blank if you want the schedule to start from the current day’s date.
- Date_To – Enter the date that slots will stop being available for this delivery schedule. You can leave this field blank if you want the schedule to run indefinitely.
- Save the file in CSV format
- Go back to the ‘Delivery Scheduling’ section of the ‘Tracking’ tab on the Settings screen in Stream
- Click ‘Upload Schedule Data’ and upload your updated CSV file
- Click ‘Save’ at the bottom of the Settings screen
If you need to make any changes to your Delivery Schedule, you can simply download the file again, make the changes, and then reupload it.
Check out our examples below of how the Delivery Schedule and Route Capacity work together. View Examples
Setting up the Route Capacity
The route capacity is what you will use to tell Stream how many delivery dates can be selected on a specific date before that date becomes unavailable for delivery date selection.
To set up your route capacity:
- Click ‘Settings’ in the main menu
- Click ‘Tracking’ in the left sidebar on the Settings screen and scroll down to the ‘Delivery Scheduling’ section
- Click the ‘Download’ button next to ‘Download Route Capacity Data’. This will download a CSV file containing your current Route Capacity data. The file will be blank if it’s your first time downloading it.
- Open the CSV file
- Enter your data into the CSV file:
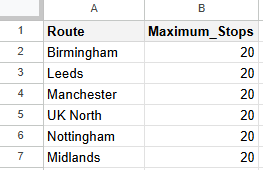
- Route – Consider this as a name for the route. The values entered here will need to match the values used in the ‘Days’ columns of your Delivery Schedule data.
- Maximum_Stops – Enter the maximum number of stops that should be available to be selected on the specific route on any given day. Once the maximum is reached for a single date, customers will not be able to select that date for their delivery.
- Save the file in CSV format
- Go back to the ‘Delivery Scheduling’ section of the ‘Tracking’ tab on the Settings screen in Stream
- Click ‘Upload Route Capacity Data’ and upload your updated CSV file
- Click ‘Save’ at the bottom of the Settings screen
If you need to make any changes to your Route Capacity, you can simply download the file again, make the changes, and then reupload it.
Check out our example below of how the Delivery Schedule and Route Capacity work together. View Example
Delivery Schedule and Route Capacity setup example
Setting up your Delivery Schedule and Route Capacity data like this will enable different delivery options for different postcode areas.
Delivery Schedule Data

Route Capacity Data
Setup summary
Here are some points to illustrate what we can see from this setup:
- The B, LS, M, and NG postcodes can all select Monday, Tuesday or Thursday delivery dates
- On a Wednesday, the Birmingham route only covers B10 postcodes, so only orders in a B10 postcode in Birmingham will be able to select a delivery date for a Wednesday.
- On a Friday, B, B10 and NG postcodes can all be covered on the ‘Midlands’ route. This could be because there are fewer deliveries to be made on this date and the stops can be consolidated onto a single route. The same goes for LS and M, which have been consolidated onto a single ‘North’ route.
- There are no delivery dates available in any location on a Saturday or a Sunday
- There are no specified date durations on the schedule, meaning this schedule will apply from the current date and run indefinitely
- Any customer who is outside of the specified postcodes will not be able to select their own delivery date for their orders