Use our helpful Getting Started Guide below to help get you and your team set up in your Stream Check account so you can begin your vehicle walkaround checks and defect reporting today!
Getting started with Stream Check
Logging in
Navigate to go2stream.net in any web browser and log in with your unique user ID and password.
You should have received two separate emails from our support team. One including your unique User ID and one containing a Password reset link.
If you have not received your login details, please contact our support team:
Email: [email protected]
Navigating the management system
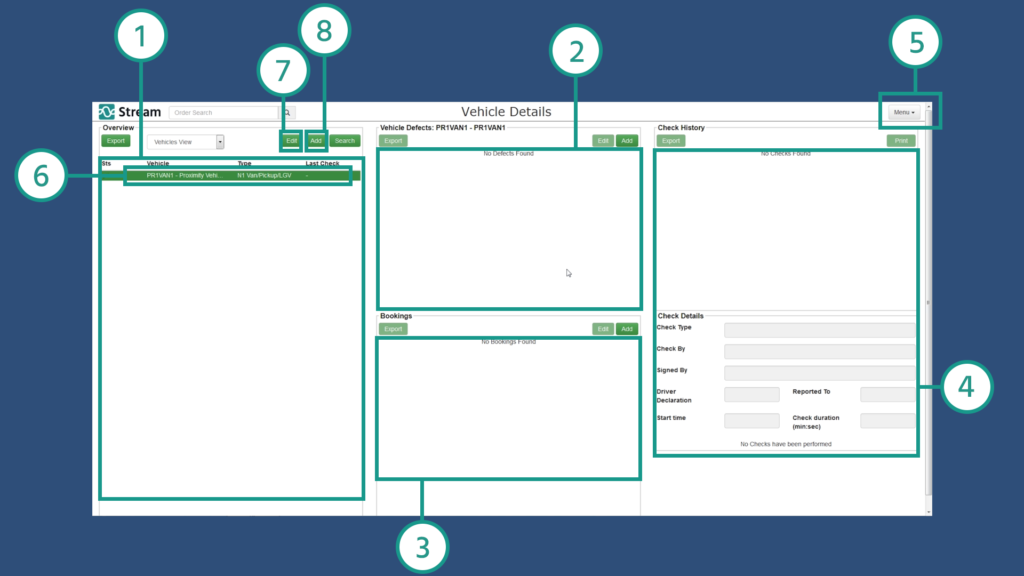
Once you have logged in, you should see the vehicle details page (or you can use the menu (top right) to navigate there).
Use the vehicle details page to manage specific vehicles (Van A or Van B). In the vehicle details page, you can see:
- All your vehicles (left)
- Defects for the selected vehicle (top centre)
- Bookings for the selected vehicle (bottom centre)
- Checks completed in the Stream App for the selected vehicle (right)
Use the menu (top right) to navigate to the other pages in the Stream Check management system, including the vehicle types management page.
Use the vehicle types management page to manage types of vehicle (van or HGV). In the vehicle types management page, you can see:
- All the types of vehicles you have in Stream (top left)
- Default details for each vehicle type (bottom left)
- Which checks are performed on each vehicle type (centre)
- Scheduled or recurring bookings for each vehicle type (right)
You can also navigate to the users and drivers page. In the users and drivers page, you can to add and manage the people on your team who will deal with vehicle checks, maintenance and bookings (drivers or transport managers).
Changing your password
You can also use the menu to navigate to the change password page and change your password. You will be prompted to change your password when you first log in. Make sure your password is secure.
Managing vehicle details
Navigate back to the vehicle details page using the menu (5). In the vehicle details page, you can see:
- All your vehicles (left)
- Defects for the selected vehicle (top centre)
- Bookings for the selected vehicle (bottom centre)
- Checks completed in the Stream App for the selected vehicle (right)
New Stream Check accounts will have one van already added (6).
Editing & removing vehicles
Double click a vehicle (6) or click edit in the overview pane (7) to view more information about the vehicle in the vehicle details popup:
You can store as much or as little information as you want about each vehicle. You can also remove (9) vehicles from the vehicle details popup.
Adding new vehicles
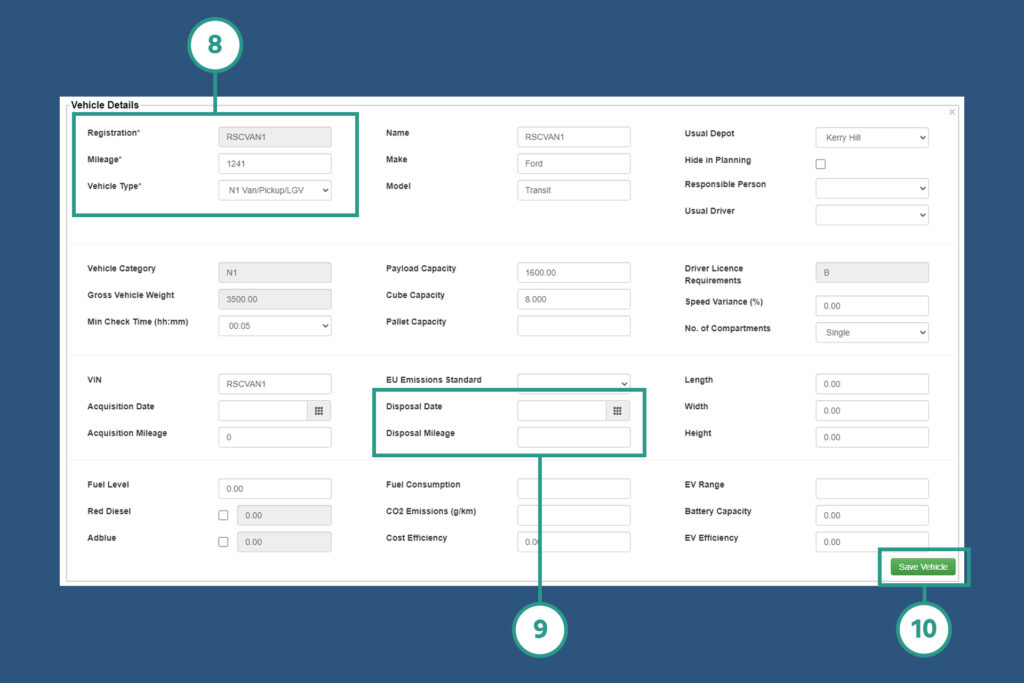
To add a new vehicle, click add (8) in the overview pane.
This will open a blank vehicle details popup. Enter all the information you have about this particular vehicle.
The only required fields (10) are:
- Registration – Enter the vehicle’s registration number. This cannot be changed later.
- Mileage – Enter the vehicle’s current mileage, or enter 0 (zero) if you are unsure. This will update whenever a check is completed in the App.
- Vehicle Type – Select which type of vehicle it is. There will be a number of vehicle types pre-populated in your account by default. You can create more the setting up vehicle types & checks section. You can change the vehicle type later.
You can also add things like the make and model of the vehicle, and you can name the vehicle to make it easier to identify later.
When you have finished adding or editing the vehicle details, just press save (11) and the vehicle details will be updated in the vehicle details overview.
Removing a Vehicle
In order to remove a vehicle from Stream, open the Vehicle details pop up as shown above.
Enter the Disposal Date (9) of the vehicle (and the mileage if required).
Once the disposal date is entered, this vehicle will no longer be accessible by drivers within the Stream App.
It is not possible to permanently delete the record of a vehicle, as it has associated runs, deliveries and collections linked to it.
Setting up vehicle types & different walkaround checks
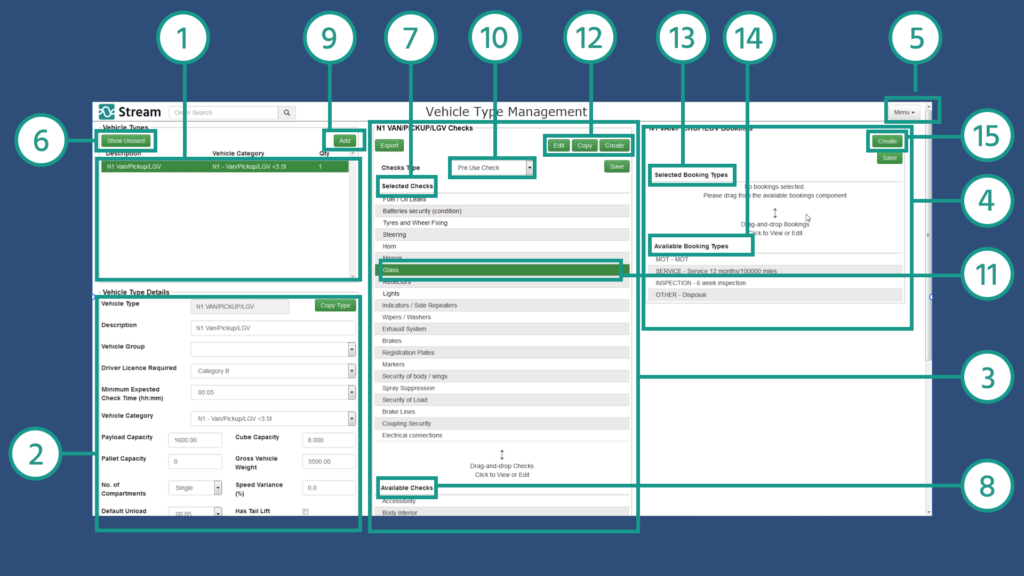
Navigate to the vehicle types management page using the menu (5). In the vehicle types management page, you can see:
- All the types of vehicles you have in Stream (top left)
- Default details for each vehicle type (bottom left)
- Which checks are performed on each vehicle type (centre)
- Scheduled or recurring bookings for each vehicle type (right)
Vehicle types management page
Here, you can manage the types of vehicles you use in Stream. Your Stream Check account will be populated with a list of default vehicle types.
Click show unused (6) to view all the types of vehicles you have in Stream.
Adding or amending vehicle types
Select a vehicle type from the vehicle types pane (1) to edit the vehicle type details, or click Add (9) to add a new vehicle type.
Change or add any information about the vehicle type in the vehicle type details pane (2), for example, the payload capacity or the minimum time in which checks should be completed.
Adding or removing vehicle walkaround checks on the checklist
In the vehicle types management page, you can also change the list of checks to be carried out on each vehicle type, in the vehicle checks pane (3). This is particularly useful when you are first setting up your Stream Check account.
First, select the check type from the drop-down (10). Pre-use, handover and end-of-day checks are populated as standard, or you can add your own check types.
Drag and drop checks between the selected checks (7) and the available checks (8) to add or remove them from the list of checks that the driver will be required to complete in the walkaround check App.
You can also edit checks to define exactly what defects can be recorded for an individual check, by double-clicking a single check (11), or selecting a single check and clicking edit (12).
If there are other checks you would like drivers to carry out on a vehicle type, you can either click create (12) to add a completely new check or copy (12) to duplicate a check and then amend the details.
Scheduling vehicle bookings
Set up scheduled bookings for a vehicle type in the vehicle bookings pane (4).
You will see four default booking types when you first set up your Stream Check account.
As with checks, you can drag and drop bookings between the selected booking types list (13) and the available booking types list (14).
To create brand new booking types, click create (15). Then, in the booking types popup, you can:
- Pick the type of booking
- Add a name & description for the booking
- Specify whether the booking should be competed based on date (every 12 weeks) or on mileage (every 10,000 miles), or both
- Set up notifications for when the next booking will be due
When a booking type is selected for a particular vehicle type, the booking frequency will automatically populate in the vehicle details page.
Completing walkaround checks in the driver App
For Android
For iOS
Accessing the app and logging in
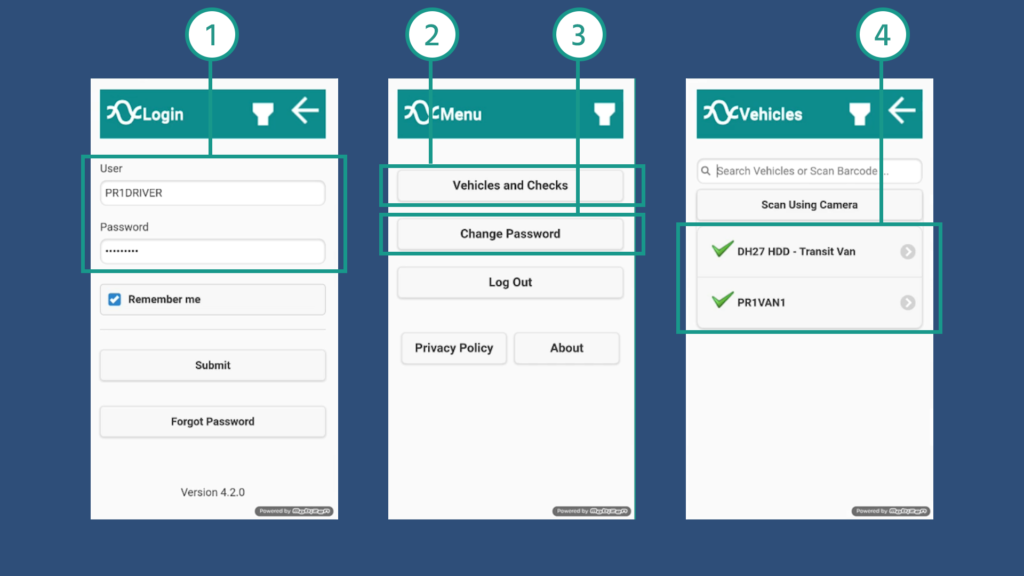
Now, drivers can complete their walkaround checks using the Stream App. Download the driver App in the Google Play Store on any Android device or in the Apple App Store on any iOS device (or search ‘Stream TMS’).
Drivers should have their own unique login to access the App, so you can see which drivers are performing which walkaround check on each vehicle. Add drivers and users in the managing users & drivers section, then login to the App (1).
From this menu, you can select the vehicle and checks option (2) to undertake the walkaround check. You can also change your password (3) from this menu. There may be other options visible here for Stream Go users.
Now you can see all the vehicles you have set up in your Stream Check account (4). Select the vehicle you are going to check.
Performing a walkaround check

Select the type of check you want to carry out. Pre-use, handover and end-of-day (5) are the default checks, but you can add others in the setting up vehicle types & checks section. From here, you can also report a single defect on any vehicle at any time of day (6), or view & update the details for any current defects on the vehicle (7).
Then, update and confirm the current mileage for the vehicle (8) and proceed to the list of checks (9).
The checklist displays all the checks set up for the vehicle in the vehicle types management page. It includes both the types of checks and the types of defects that have been selected for each vehicle.
Recording a vehicle defect
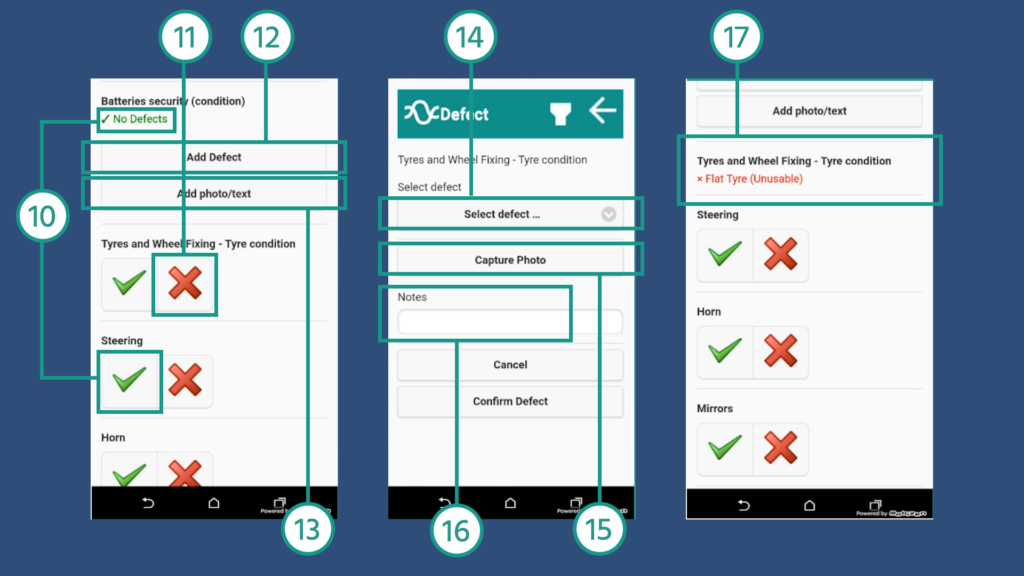
The driver can now start checking the vehicle, pressing the tick (10) to mark a check as completed okay. Even after a check has been marked as okay, further defects can be added later if required (12). You can also add text or photos to checks without defects (13), if you want to keep that information for your own records or as proof that the check has been carried out.
Press the cross (11) to record a defect. On the defect page, you can:
- Select the defect (14) to indicate exactly what is wrong with the vehicle – these can be set up in the vehicle types management page
- Take a picture of the defect on the vehicle (15)
- Note down any other details (16)
When the defect has been confirmed, it will display in the vehicle checklist as a red cross and red text (17), showing that that’snow been marked as a defect, making this vehicle unusable.
Reporting vehicle defects
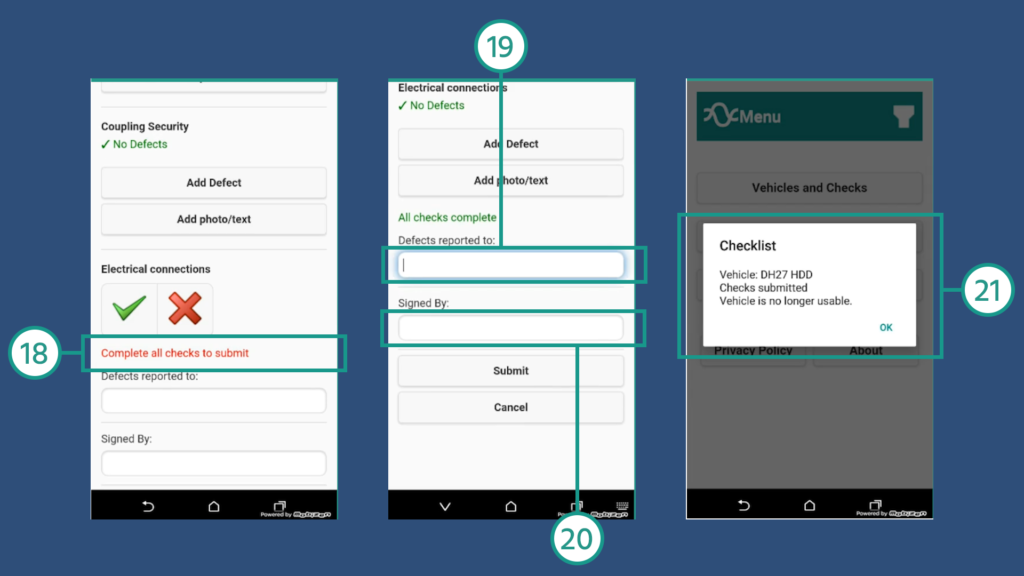
The driver must complete all checks before the report can be submitted (18), marking them as either completed successfully or with a defect.
Stream Go records the length of time it takes drivers to complete the check as well, so you can see if the driver is going too fast (and therefore may not be paying attention). You can even set up a notification to be sent to a manager if a driver completed the check under a specific amount of time (for example, if all checks are completed within 5 minutes you can alert a manager to double-check the vehicle).
The driver then records who they reported any defects to (19), and ‘signs’ their name (20) to verify they completed the check.
When a vehicle check is submitted, the data is automatically uploaded to the cloud, and the information is visible in the Stream Check browser-based back-office system. When a check is submitted with a defect that marks the vehicle as unusable, a warning will pop up before the driver exits the App (21).
Managing walkaround checks & defects
Go back into the browser-based system, return to the vehicle details page and press refresh.
Managing walkaround checks and defects
The page will now update to show the completed check in the check history on the right-hand side (1). This displays (2):
- Check status (whether it passed or failed)
- Check date (the date when the check was completed)
- Check by (the driver who completed the check)
- Check type (pre-use/handover/end-of-day or a custom check type)
- Mileage (the current mileage recorded on the vehicle)
- Defect severity (Whether the vehicle is still usable)
Below that is the Check Details panel (3) which displays more information about that particular check:
- Check type
- Check by (the driver who was logged in when the check was carried out)
- Signed by (the name of the person who carried out the check)
- Reported to (who any defects have been reported to)
- Check duration (How long the check took to complete. A red box shows that the check was completed faster than the minimum expected check time)
- Details for each specific check (4):
- Check status (a tick or a cross to show whether it passed or failed)
- Details about that check, including notes and photos
- How long it took the driver to complete each individual check
Resolving defects
You can also see that there is a defect in the middle section (5). From here, you can double-click the defect, or select the defect and click edit (6) to open the defects popup with more information about this specific defect.
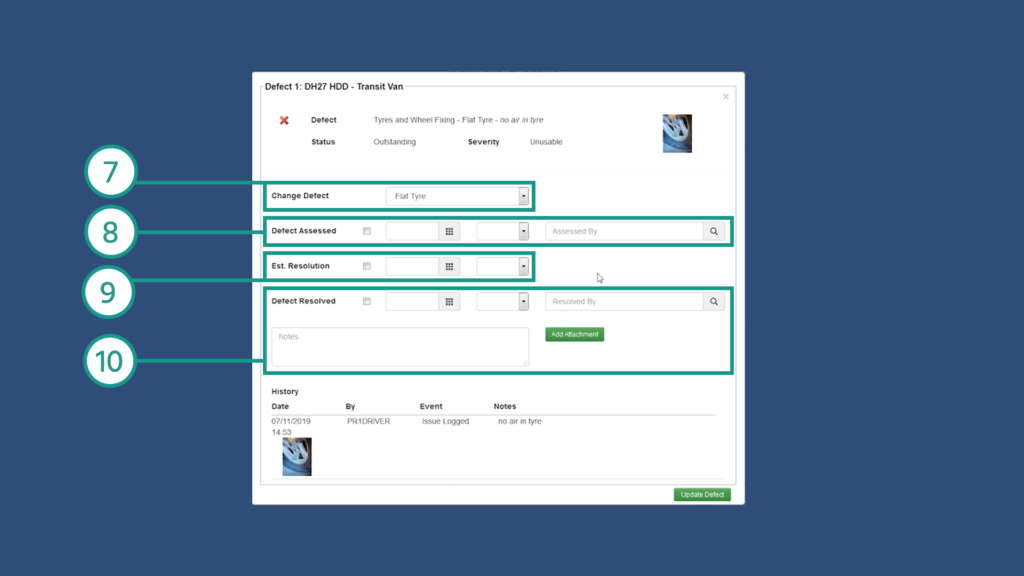
In this popup, you can change the defect details (7). This is also where you will record defect resolution details, like:
- Whether the defect has been assessed, the assessment date (this can be a future date if an assessment has been scheduled) and who it has been assessed by (8)
- An estimated date for resolution (9)
- Actual resolution details (whether the defect has been resolved, the resolution date and who it was resolved by (10). You can also add notes and attachments relevant to the resolution of the defect (like a garage invoice, for example)
When the defect is updated in the popup, the defect details (5) will update, and so will the vehicle status (11). All the information about defects and the vehicle’s full defect history will remain available in Stream, for your records.
Managing users & drivers
In Stream Check, you can also manage your users and drivers. Navigate to the users & drivers management page using the menu (5).
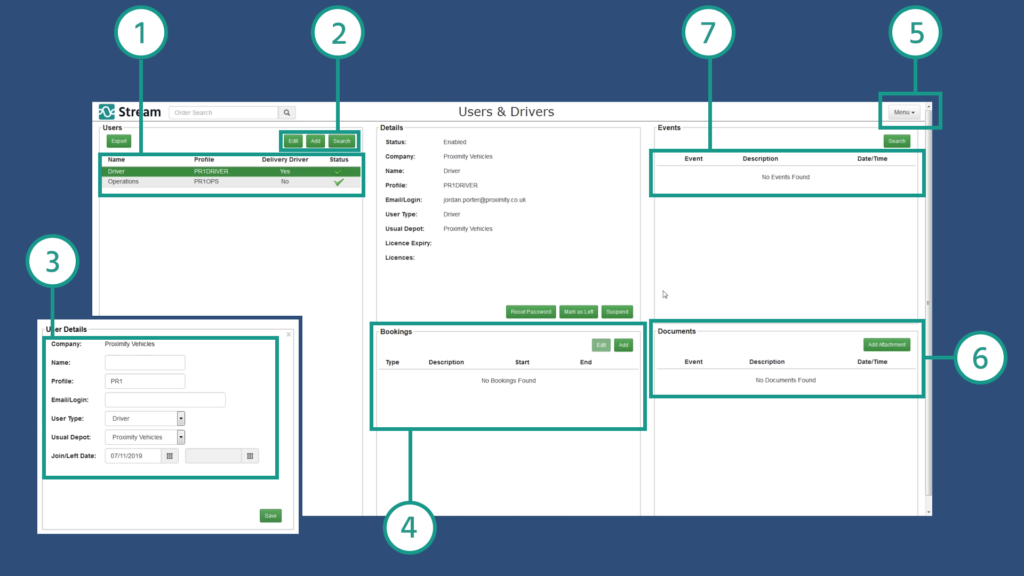
In the Users & Drivers page, you can see:
The list of users (1). There will be a number of users pre-populated in your account by default:
- Operations user
Someone who uses the browser-based management system.
An operations user can view and manage vehicles, vehicle types, manage defects and add new users. - Driver
Someone who only has access to the App.
These users can only perform checks within the App.
You can add as many users as you want in your Stream Check account. Click add (2) to create a new user or edit (2) to change the details for a user. This will open the user details popup (3), where you can enter details like:
- Name (the user’s own name)
- Profile (the login name of the user)
- Email login (the user’s email address, which can also be used to log in, or to reset passwords)
- User type (operations or driver)
- Usual depot (their normal place of work, if you have multiple locations)
- Join or leave dates for the user
In the Users & Drivers page, you can also manage all the information about your drivers in a single location:
- Add and amend bookings for drivers (4), like annual leave or sick leave
- Upload documents (6) like drivers licences or other qualifications
- Monitor events (7), like failed vehicle checks