Master runs, or ‘milk runs’ as they’re commonly known in the industry, are an easy way to set up orders and runs that recur on a regular basis, so that you don’t need to set them up from scratch every day/week/month or however often they occur.
These are essentially templates that we can use as a base for creating new runs in Stream.
Initial Setup
The ability to create master/milk runs requires an initial bit of setup on your account by the Stream support team, during which they will create a ‘Master Delivery Method’ for you.
Your system administrator will need to contact Stream support to let them know that you need this functionality adding to your system.
If your company already has Master Orders set up for use, you can move onto the next step.
Upload Master Orders
You create Master Orders by taking the details of your existing fixed routes/milk runs, which are standard orders, and changing some of the information in specific columns of an order upload file, which are detailed below.
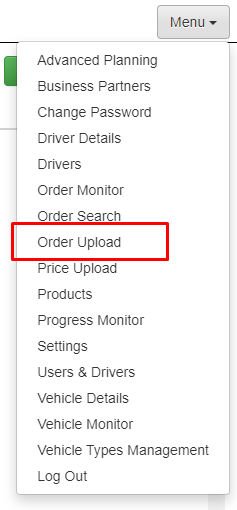
‘Master Orders’ are uploaded to Stream using the ‘Order Upload’ page found in the main menu, however, Master Orders have specific Order Numbers and Delivery Methods.
These are edited in their respective columns in the order upload file.
- The Order Number should be specific for the Master Run that we are going to set up, we would recommend using a prefix that makes it clear these orders are related to a master run.
Column Name:Order_No - The Delivery Method will need to be set to the Master Delivery Method, which our support team will have set up for you during the initial setup and will have supplied you the details of.
Column Name: Delivery_Method
In this example, we will enter the code ‘RSCMAST’ in the ‘Delivery_Method’ column of our order upload to link the orders to our ‘M – Kerry Hill Masters’ Master Delivery Method, as that is the information we have been supplied by Stream Support.
Step 1: Add the order details to the spreadsheet
Enter the details of the orders on the fixed route for which you wish to create a master and then amend the Order No and Delivery Method columns, as mentioned above, and then save the file as an XLS (Spreadsheet) somewhere accessible on your computer.
Step 2: Upload the orders
Upload the Orders by going to the main menu in Stream and selecting ‘Order Upload’ and selecting the file that you’ve just saved.
Creating the Master/Milk Run
Head to the ‘Advanced Planning’ page from the main menu in Stream.
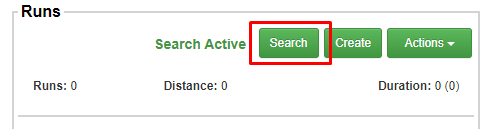
Step 1: View existing master runs
In the runs module in the top left of the screen, click ‘Search’.
In the ‘Method’ drop down box, select the Master Delivery Method that has been created by the Stream support team at the start of this guide.
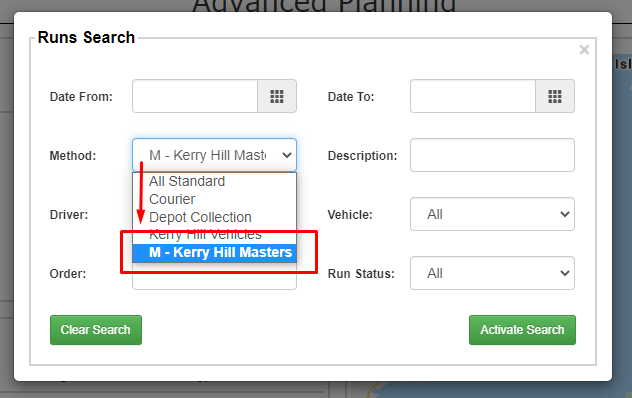
This will show you any Master Runs that have already been created.

Note: Master runs are displayed with a solid block ‘M’ on them, as well as with an ‘M – ‘ prefix in the name to denote that they are masters and not normal runs.
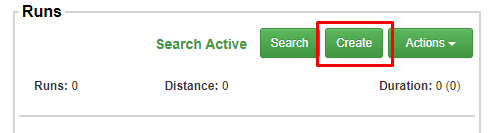
Step 2: Create a new master/milk run
In the runs module in the top left of the screen, click ‘Create’.
This will bring up the following window:
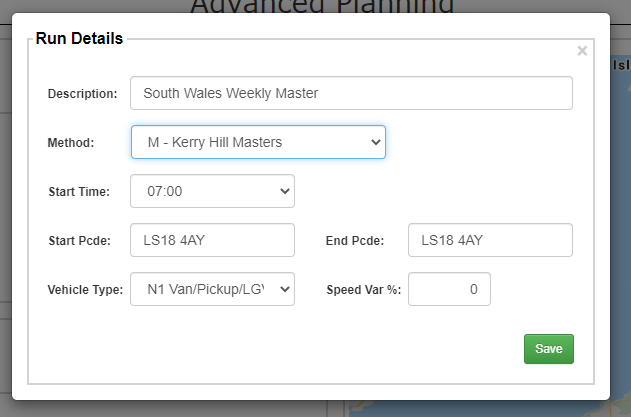
Fill out the various fields in the popup window:
- Description – Use something meaningful that identifies this particular master run, such as the region/area and day of the week that the run will be repeated on.
- Method – Select the Master Delivery Method that has been created by the Stream support team at the start of this guide. This will tell Stream to create this run as a Master Run.
- Start Time – the time at which this master/milk run will commence each time it occurs.
- Start Postcode – The postcode where the driver/vehicle will start the run.
- End Postcode – The postcode where the driver/vehicle will end the run.
- Vehicle Type – the type of vehicle that this particular run will be completed in.
- Speed Variance – Only use this field if the vehicle is limited to specific speeds, as it will affect the calculation of the route duration and ETAs.
Note: these elements can be altered when we create each instance of this run in the future.
Once you’re happy with the information you’ve entered, click ‘Save’.
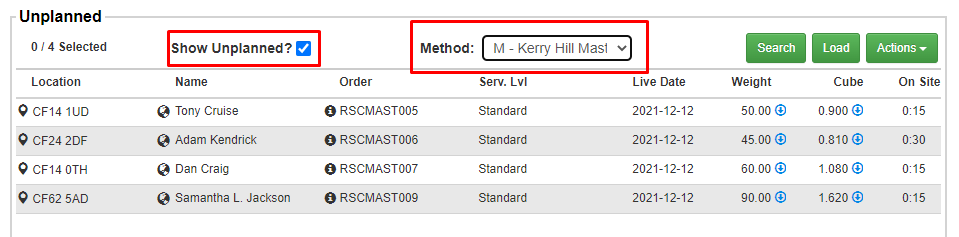
Step 3: View the orders for this master/milk run
Now we’re going to display the orders we uploaded earlier in this process so we can set them as the orders on this master run.
In the ‘Unplanned’ module, for method, select the Master Delivery Method from the drop down menu, making sure that the ‘Show Unplanned’ box is checked.
Step 4: Load the relevant orders for your master/milk run
We then need to select the orders that we want to load onto this master run.
There are 3 different ways we can load the orders from ‘unplanned’ into the selected run:
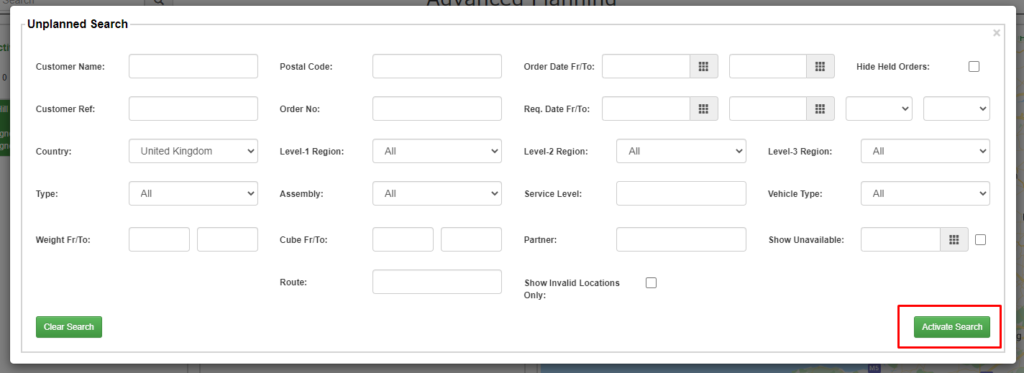
i. Filter and load
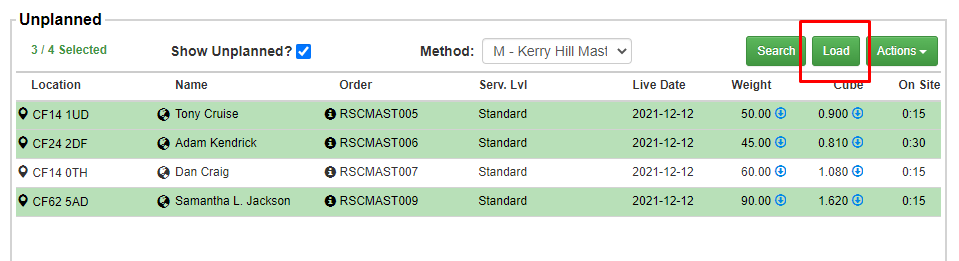
Click the ‘Search’ button and choose the criteria for orders that you want to load, then click ‘Activate Search’. This will populate the Unplanned list with orders that match the criteria, then you can simply click ‘Load’ and on the popup window, confirm that you want to load all the visible orders onto the run.
or ii. Select and load
Load orders one at a time by clicking the order and then clicking ‘Load’, OR load a group of orders by holding shift and clicking the first and last items in the list then clicking ‘Load’, OR select a group of individual orders by holding control (ctrl) and clicking the individual orders one at a time and then clicking ‘Load’.
or iii. Select using the map
Click the ‘draw a shape’ tool on the map and then draw around the orders, shown on the map as pins’ to select the orders. This will highlight the ones you have selected in the ‘Unplanned’ module and you can then click ‘Load’.
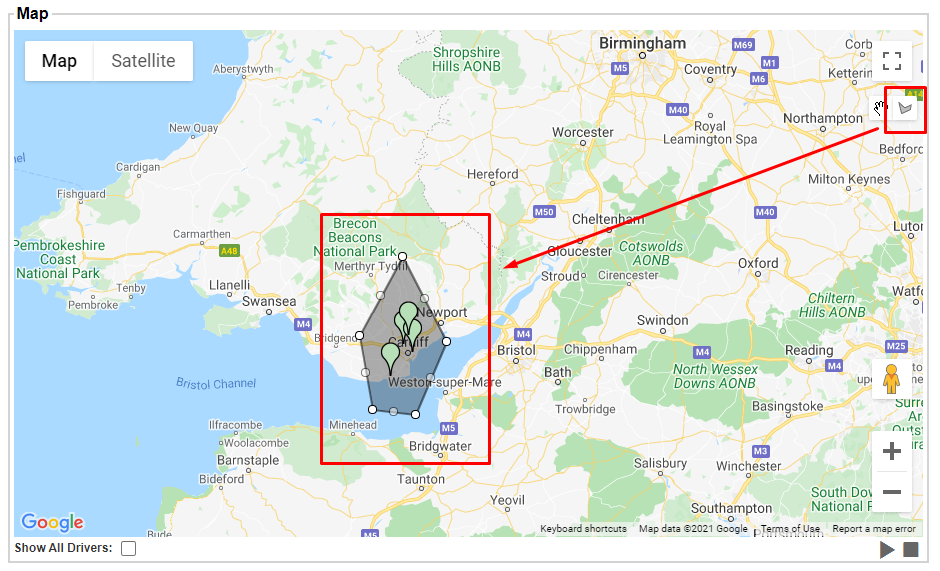
Note: you can also click on the map pins individually to load them onto the run.
Step 5: Save the Master Run
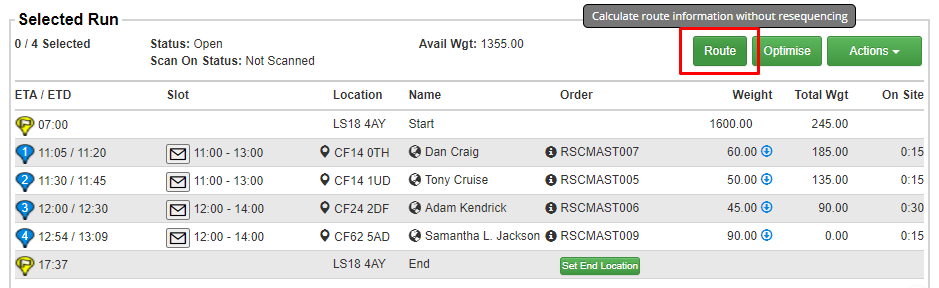
Master Runs are a little bit different to normal runs, as we don’t need to ‘close’ this run to complete it. It will be automatically saved as soon as we confirm the route.
Once you’re happy with the orders you’ve loaded onto your Master Run, go ahead and click ‘Route’ in the ‘Selected Run’ module.
If the Master Run should change at any point in the future, we can simply come back into Advanced Planning, search for the Master Run in the ‘Runs’ module and then select it and click ‘Edit’.
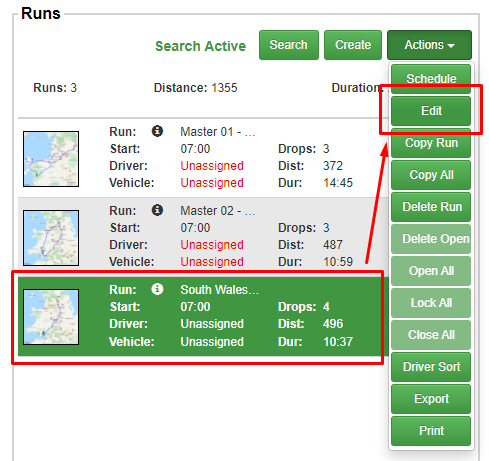
This will allow us to add new stops on the run, or remove existing ones and these changes will be applied whenever a new run is created using this Master Run.
IMPORTANT:
If you know it will usually be the same driver and vehicle being used for this run, you can assign those to the run in the Advanced Planning window. These will then be pre-populated when you create each new instance of the run.
The next step of the process would be to create a new run from the Master Run. You can follow our separate guide on ‘Creating a new run from a Master Run/Milk Run‘.