We include, by default, booking types for MOT, Service and inspection, however it is possible to create your own specific vehicle booking type that you can use on your vehicles in Stream.
Step 1: Go to ‘Vehicle Types’
Go to the ‘Vehicle Types’ page in Stream (accessed through the main menu in the top right hand corner).

Step 2: Select the Vehicle to create a booking type for
In the ‘Bookings’ module on the right hand side of the screen, you will see the different booking types.
The ‘Selected Booking Types’ will vary based on which vehicle you have selected in the ‘Overview’ module on the left hand side of the screen.
Select the vehicle you would like to create a booking type for in the ‘Overview’ module.
Then click ‘Add’in the Bookings module.

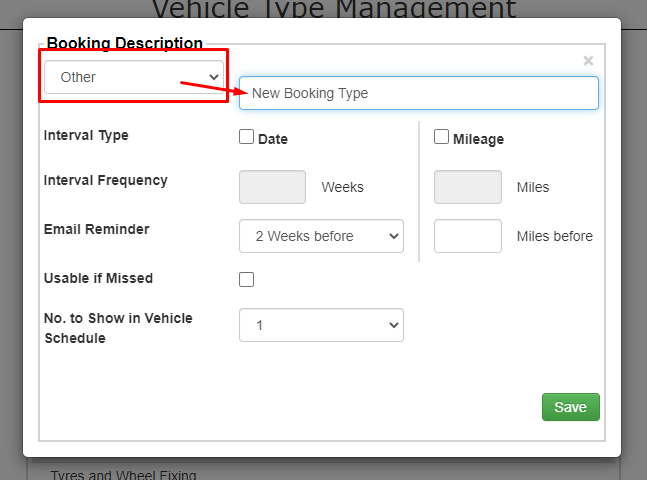
This will open the Vehicle Booking Type creation window.
Step 3: Select the booking type and enter a name
In the dropdown box, select the type of booking that this is and enter a name for the booking type in the text field.

Step 4: Select interval/frequency
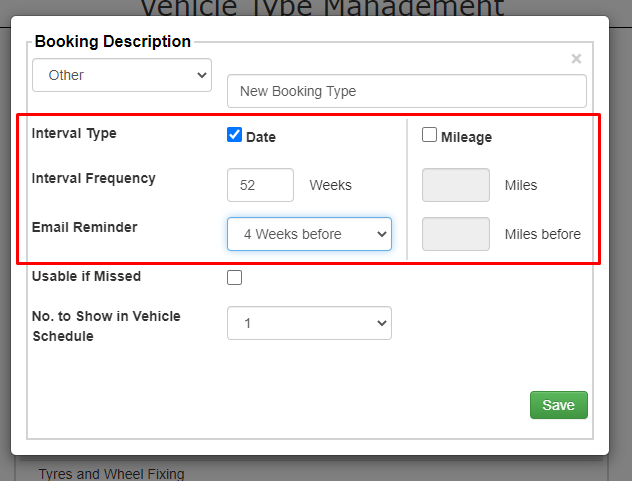
There are two types of intervals you can choose if you want this to be a recurring booking such as a service or MOT.
- Date – for bookings that have a time sensitive frequency, IE every 12 months.
- Mileage – for bookings that have a mileage sensitive frequency IE every 10,000 miles
If neither of these are suitable for this booking type you can leave both fields unticked.
Select the interval type(s) that is suitable for this booking and check the relevant box.
If you have ticked either the Date or Mileage boxes, then use the Interval frequency fields to tell Stream how often these bookings occur.
You can then use the ‘Email Reminder’ field to state how far in advance of the booking you’d like to be sent an automatic email reminder to ensure that you don’t forget to schedule the booking with the relevant parties IE engineer, garage, etc.

Step 5: State whether the vehicle is usable if the booking is missed
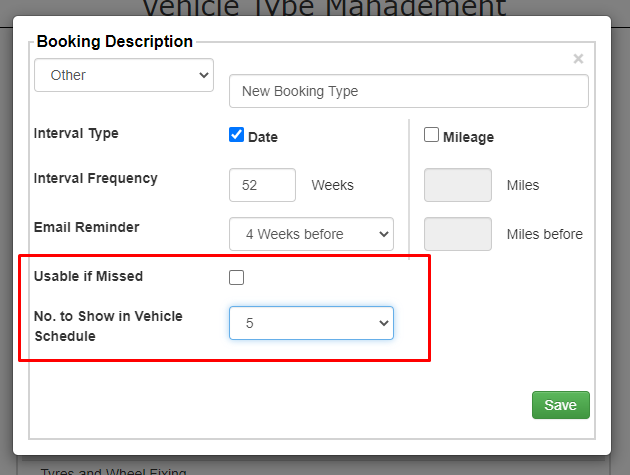
The ‘Usable if Missed’ check box allows us to state whether a vehicle can remain in use if the vehicle booking type is missed.
If we leave the box empty, the booking will need to be successfully completed or else the vehicle will stop being available to be selected on runs in Stream. You would use this for something where the booking completion is a requirement for the vehicle to be allowed on the UK roads, such as an MOT or Road Tax.
If this is the case, then leave the box unchecked.
However if you’d like your vehicle to remain usable if the booking date has passed, then check the box.
Step 6: Show how many booking instances to show
The ‘No. to Show in Vehicle Schedule’ field relates to bookings which have a recurrence, such as a service or MOT.
When you add the initial booking for this vehicle type, it will use the number in this field to automatically create that many recurring instances of the booking.
For example if we enter the number 5 in this box, and the booking occurs once per month, it will automatically add the next 5 months worth of bookings to the vehicle based on the due date we add to the first instance of the booking.

Step 7: Save the vehicle booking type
Once all of the information has been filled out, you can go ahead and click ‘Save’ to finish creating this ‘Vehicle Booking Type’.
Step 8: Add the booking type to the vehicle
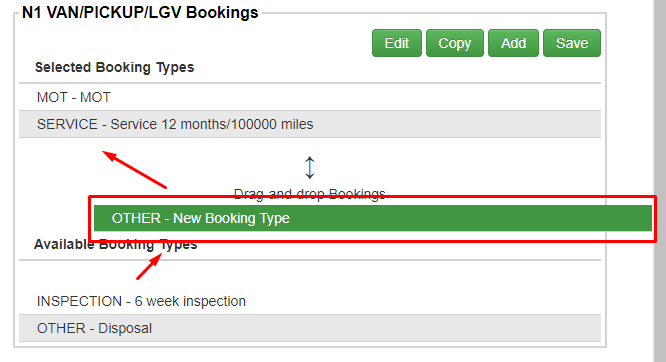
Now the Booking type will appear in the ‘Available Booking Types’ for this vehicle in the ‘Bookings’ module and you can use drag and drop to move it into ‘Selected Bookings’.

Step 9: Save the selected booking types
Once you’ve added the booking type to your vehicle, click ‘Save’ at the top right of the ‘Bookings’ module.