Autoplanning runs helps you drastically reduce the manual administration of creating and planning your runs.
The ‘Planning to fleet’ feature allows you to automatically create runs, assign drivers and vehicles, and populate them with your unplanned orders.
With the addition of ‘Planning to ‘Required Time’ Slots’, you can automatically plan any orders with a ‘Required Time’ set against them, ensuring that the required time window is met, as well as planning any unplanned orders that you currently have filtered/selected.
Planning to fleet
The ‘Plan to fleet’ feature will automatically create runs, assign a vehicle and driver, and then assign all of your unplanned orders to these runs, factoring in:
- Vehicle availability (Usable at this depot, no major defects reported, and not assigned to a run with a conflicting time)
- Vehicle max weight capacity
- Vehicle max cube capacity
- Speed variance of the vehicle

How to plan to fleet:
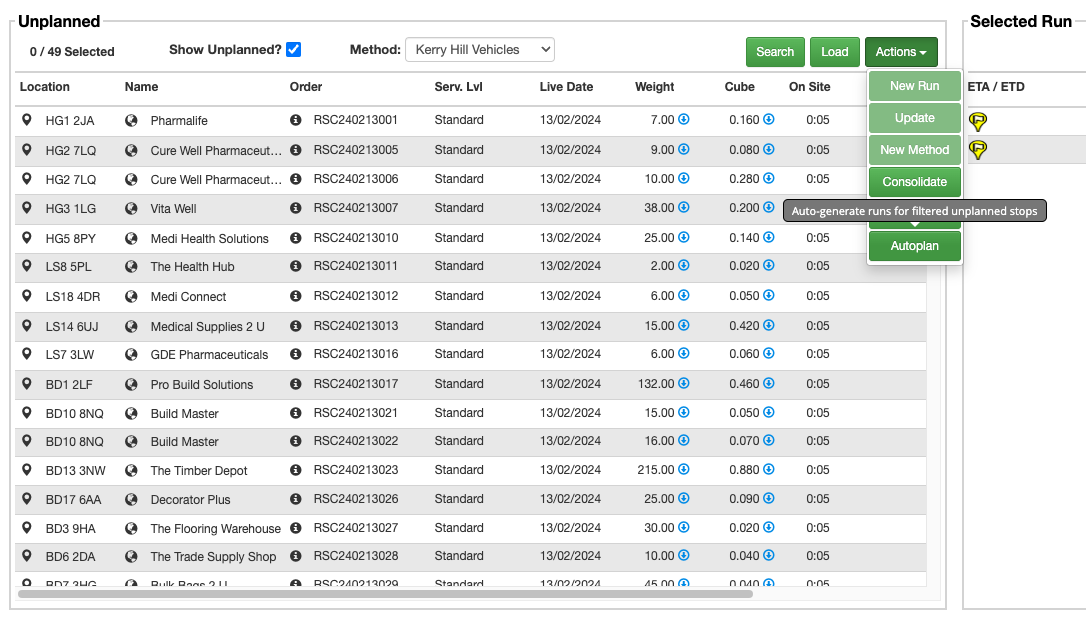
- In the main menu, click ‘Advanced Planning’
- In the ‘Unplanned’ section, ensure the search filters are set to display the orders you would like to plan, and then click Actions > Autoplan. If any orders are selected (highlighted) in the ‘Unplanned’ section, then ONLY those orders will be autoplanned. Ensure you have no orders selected unless meaning to do so
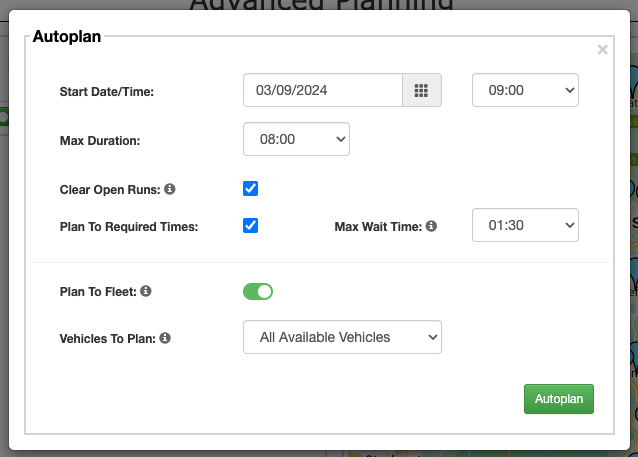
- Enter the ‘Start Date/Time’ for the runs that will be created
- Set the ‘Max Duration in hours & minutes’, this will prevent runs being created that last longer than the specified duration
- If you wish to delete any open runs to make their orders available to be planned during the Autoplan process, then check the box for ‘Clear Open Runs’ (this will also clear any selection you have made in the ‘Unplanned’ section)
- Leave the box unchecked for ‘Plan to Required Times’
- Leave the toggle ON for ‘Plan to fleet’
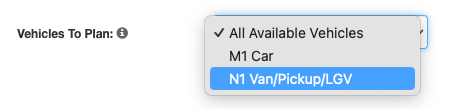
- Select which ‘Vehicles to Plan’. ‘All Available Vehicles’ will be selected by default, but you can refine this to use a specific vehicle type using the dropdown menu.
- Click the ‘Autoplan’ button
Once the process is completed, your unplanned orders will now be planned onto the newly created runs. Any orders that cannot be planned will remain in the ‘Unplanned’ section. Check out our Orders not planned when using Autoplan article for help with why this has happened.
Planning to ‘Required Time’ slots
Planning to ‘Required Time’ is an additional Autoplan functionality, which allows for runs to be automatically created and planned exactly the same as in ‘Planning to fleet’ however, it will also plan any orders with a ‘Required Time’ set against them to be delivered at the time specified.
How to plan to ‘Required Time’ slots
- In the main menu, click ‘Advanced Planning’
- In the ‘Unplanned’ section, ensure the search filters are set to display the orders you would like to plan, and then click Actions > Autoplan. If any orders are selected (highlighted) in the ‘Unplanned’ section, then ONLY those orders will be autoplanned. Ensure you have no orders selected unless meaning to do so
- Enter the ‘Start Date/Time’ for the runs that will be created
- Set the ‘Max Duration in hours & minutes’, this will prevent runs being created that last longer than the specified duration
- If you wish to delete any open runs to make their orders available to be planned during the Autoplan process, then check the box for ‘Clear Open Runs’ (this will also clear any selection you have made in the ‘Unplanned’ section)
- Check the box for ‘Plan to Required Times’
- Enter a ‘Max Wait Time’, which is the maximum amount of time a driver can wait/remain idle across the entire run Learn More
- Leave the toggle ON for ‘Plan to fleet’
- Select which ‘Vehicles to Plan’. ‘All Available Vehicles’ will be selected by default, but you can refine this to use a specific vehicle type using the dropdown menu.
- Click the ‘Autoplan’ button
Max Wait Time
The ‘Max Wait Time’ field sets the maximum amount of time, for the duration of the whole run, that the driver is able to wait/remain idle in order to complete any stops with a ‘Required Time’ against them.
For example, if you set your Autoplan runs to start at 7:00am, and the first stop on the run has a required time of 9:00am and it will take the driver 30 minutes to get to the destination, but you have set the ‘Max Wait Time’ duration to 1 hour, then it will not be able to Autoplan the stop because that would require a 1 hour 30 minute wait time for the driver.
Autoplan Settings
There are a few Autoplan settings on the ‘Settings’ screen that you can edit to customise your default settings when autoplanning runs:
- Use the legacy version of Autoplan
This will use an older version of Autoplan, which will plan all unplanned orders to as many runs as required, without the ability to ‘Plan to Fleet or Plan to Required Times’ - Autoplan – Default max duration per run (hours)
Sets the default maximum run duration. Autoplan will then not create runs that exceed the duration set (Can be changed manually during each use of Autopan) - Autoplan – Default run start time
Sets the default time that runs will start at when using Autoplan (Can be changed manually during each use of Autopan) - Autoplan – Default max wait time
Sets the maximum amount of time, for the duration of the whole run, that the driver is able to wait/remain idle in order to complete any stops with a ‘Required Time’ against them (Can be changed manually during each use of Autopan) - Satellite Break Duration
Only applicable if using Satellite depots, this sets the break duration that’s created for delivering an item to a stock location which differs to the depot associated with the used delivery method - Timeslot Break Description
Sets the description to be displayed on automatic breaks created for driver wait times against stops with Required Times. If left blank, the default description will show ‘Wait for Required Time’
Autoplanning checklist
Here is a quick checklist to help you make sure you have everything set up correctly in your account so that Autoplanning will work exactly as expected
- Ensure the ‘Payload Capacity’ and ‘Cube Capacity’ fields are filled out correctly against each vehicle on the ‘Vehicle Details’ popup
- Ensure the relevant ‘Usual Depot’ is assigned to each vehicle on the ‘Vehicle Details’ popup
- Ensure the relevant ‘Usual Driver’ is assigned to each vehicle on the ‘Vehicle Details’ popup
- If vehicles will be starting from or ending at a different location to the depot, please include the postcodes in the Origin and/or Destination field on the ‘Routing’ tab of the Vehicle Details popup. If you need help with this, please contact Stream Support