Manual stops are stops that you can add to any run that you create, in addition to the stops for orders being loaded onto runs. A yellow row colour denotes a manual stop within the ‘Selected Run’ section of the ‘Advanced Planning’ screen.
You can use these to allow time on the run for things like lunch breaks, overnight stops, driver breaks, or just a general stop that does not specifically have an existing order.
Adding a manual stop
To add a manual stop to a run:
- Select the relevant run in the ‘Runs’ list on the ‘Advanced Planning’ screen
- In the ‘Selected Run’ section, click the ‘Actions’ button
- Click ‘Add Stop’
- In the popup window, enter a name/description for the stop
- Enter the postal code and/or the latitude/longitude for the stop. Lat/Long will automatically be updated upon saving if you enter a postcode.
- Select the duration for the stop OR set a resume date & time
- In the ‘Weight’ field, you can enter a weight adjustment for the vehicle at the stop [Optional]. You can enter a positive value (+) to increase the weight of the vehicle at this stop, or you can enter a negative value (-) to decrease the weight of the vehicle at this stop.
- With your stop details added, click ‘Save’. The stop will be added to the run and will have a yellow row colour.
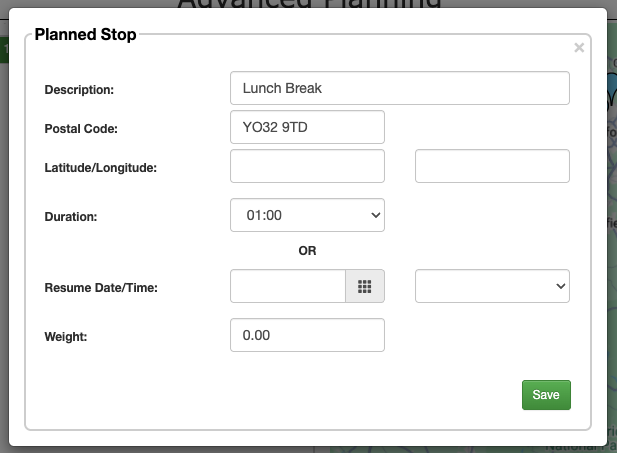
- If you entered a postcode or lat/long, you can now click ‘Optimise’ to have the stop sequenced into the correct position on the run and update any affected ETAs. Alternatively, you can click & drag it into a specific position on the run and then click the ‘Route’ button to update any affected ETAs.
Setting up automatic driver breaks
An automatic driver break allows to you insert a driver break automatically after a driver has been driving for a set period of time on the run.
To set up a driver break to be added to a run automatically:
- In the main menu, click ‘Settings’
- In the sidebar of the ‘Settings’ screen, click ‘Planning’
- Scroll down to the ‘Automatic Driver Break’ section
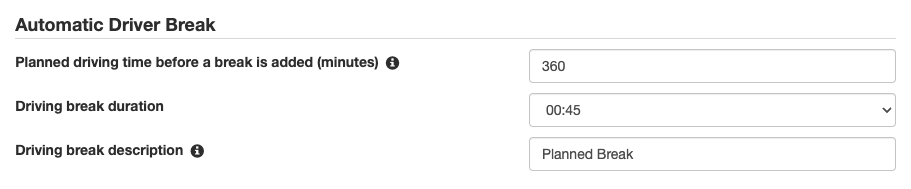
- Enter a ‘Planned driving time before a break is added’. This value for this field should be entered in ‘Minutes’, for example, if you want to add a break after 6 hours of driving, you would enter 360.
- Enter a ‘Driving break duration’. This is the duration of the break that will be added and is used to calculate accurate ETAs for the stops occurring after the break.
- Enter a ‘Driving break description’. This is the label that will appear on the stop when it’s added to the run to state what the break is for.
- Scroll to the bottom of the ‘Settings’ screen and click ‘Save’.
A driver break will now be automatically added to a run when the duration of the run exceeds the number of minutes stated in the ‘Planned driving time before a break is added’ field.
Editing a manual stop
To edit an existing manual stop on a run:
- Select the relevant run in the ‘Runs’ list on the ‘Advanced Planning’ screen
- Double-click on the manual stop in the ‘Selected Run’ section
- Make the required changes
- Click ‘Save’ to confirm your changes
Deleting a manual stop
To delete a manual stop and remove it from a run:
- Select the relevant run in the ‘Runs’ list on the ‘Advanced Planning’ screen
- Double-click on the manual stop in the ‘Selected Run’ section
- Click the ‘Delete’ button