How to Upload Orders
It’s very simple to upload orders into Stream and this can be done using an CSV, XML or XLSX file format.
Step 1: Open the Stream Order Upload spreadsheet
During your Stream handover you will have been provided with the Stream Order Upload spreadsheet.
IMPORTANT:
You do need to be aware that information needs to be entered into the columns in the correct formats for Stream to import your orders correctly. You can learn about the correct column formats in our ‘What format should the columns be in when uploading orders‘ help article.
Open the spreadsheet in an editor such as Microsoft Excel, Numbers (Mac) or Google sheets.
Step 2: Add your orders to the spreadsheet
Add your order data into the appropriate columns, ensuring all order information has the correct format.
If you would like to have multiple items on an order, add an additional order row for each item.
Please ensure the order number at the start of the line is the same for each item that needs to go on the order.
Step 3: Save the Order Upload spreadsheet
Save the order order upload spreadsheet to your computer when you’re happy with the data.
Step 4: Upload the spreadsheet into Stream
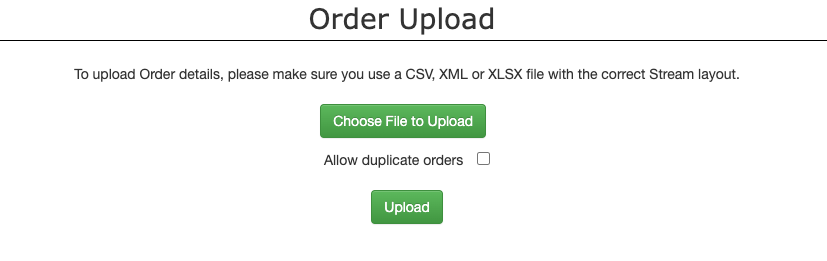
From the main menu in the top right corner of Stream, head to ‘Order Upload’
Click ‘Choose File to Upload’ and locate the order upload spreadsheet that you’ve just saved.
Then click ‘Upload’.
Your orders will now be in Stream as ‘Unconfirmed Orders’. These will need to be confirmed before they’re available for planning.
For help confirming your orders, view our ‘How do I confirm orders in Stream‘ help article.
Uploading Multiple Line Items on a Single Order
On the CSV Upload method for getting orders into Stream, it is possible to add multiple line items under one order (IE a single order containing multiple items).
Where an order has multiple line items, these should be listed as separate rows on the CSV file, however the same Order Number (Order_No Column) should be noted on each row, as this is what will tie multiple items to the same order.
For instance, an order with 5 item lines would look something like this:

…with the individual items on the order listed under the respective columns.
Once you have filled out the relevant columns and uploaded your CSV file to Stream, you should have your full list of itemised goods shown on your order as seen in the screenshot below.
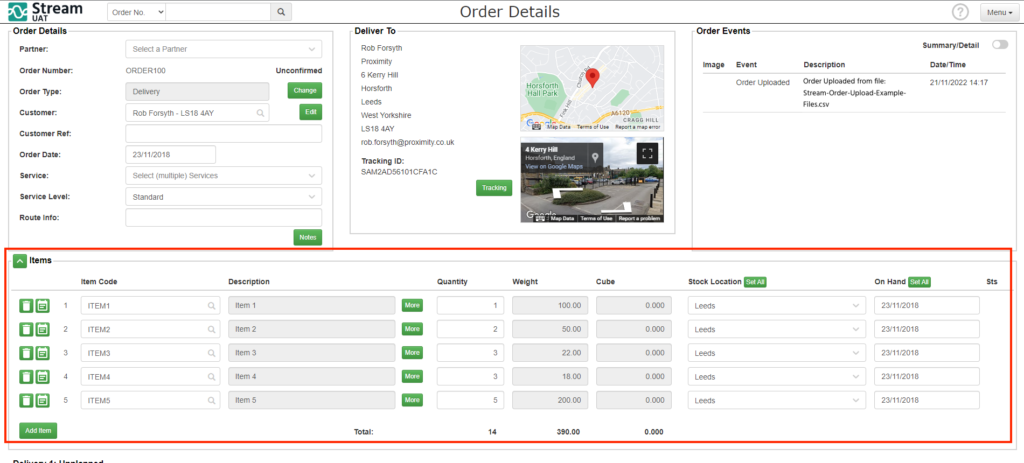
This is also what will be shown on the Proof of Delivery document for the customer, upon completion of the delivery.
PLEASE NOTE:
If you are only using ONE Depot/Delivery Method, then the Item Stock Location field can be left blank and Stream will default this to your primary Depot/Delivery method on import. However if you are using multiple Depots/Delivery Methods, you will need to populate these columns with the respective Depot ID and Delivery Methods in your CSV upload.
For more help with getting your orders into Stream, check out our Creating, Importing & Uploading Orders help articles.
Order Upload Column Formats
It’s important to understand that when uploading orders into Stream, the data needs to be entered in the correct format to ensure your orders are imported correctly.
Required date and time:
- All dates need to be in the DD/MM/YYYY format
- ‘Required’ times need to be in 24-hour format , with hours and minutes separated by a colon, eg: 07:30 or 22:00
- When entering a required date/time, please ensure that the ‘Required_Date’, ‘Required_Time_F’ and ‘Required_Time_T’ fields all have a value. All three need to be entered in order to upload a required date/time. In case you only want to enter a required date, please enter 00:01 and 23:59 in the time from and to columns.
Assembly
- If an item requires assembly, please put ‘Yes’ into the ‘Assembly’ column.
- The assembly time (‘Assy_Time’) and unload time (‘Unload_Time’) need to be in a 24 hour format where hours and minutes are separated by a colon: 00:15 for 15 minutes or 10:30 for 10 hours, 30 minutes.
Item Codes
- Items added to the ‘Item_Code’ field that are not yet in Stream will be created during the upload using the description (‘Item_Desc’), weight (‘Item_Wgt’) and cube (‘Item_Vol’) entered on the spreadsheet.
Country Codes
- Please enter a country code (‘Ctry_Code’) of ‘GB’ for UK orders. For other countries, enter the ISO country code with length 2.
- A list of 2-character country codes can be found here.
Service Level
- The Service Level (‘Service_Lv’) needs to be one of the service levels set up for you in Stream
Order details
- For the ‘Order_Date’ and ‘Item_Onhand_Date’ columns, when a value of ‘TODAY’ is entered, today’s date will be applied in the upload.
- If the order date is not ‘TODAY’ then please use the DD/MM/YYYY format
- Customer Name, Address and contact details should be entered if they are different to the Delivery details. If the customer does not exist in Stream it will be created.
Delivery Method
- If Delivery Method is blank the default will be used. If you have multiple delivery methods please contact [email protected] for the codes to use.
Stock Location
- If Stock Location is blank the default will be used. If you have multiple stock locations please contact [email protected] for the codes to use.